If you're looking to add a little bit of spice (literally) to your life, consider growing bell peppers in pots.
Bell peppers are the perfect way to do just that. Not only are they delicious, but they are also easy to grow in pots. With a few simple tips, you can have peppers growing in no time.
Whether you're new to gardening or just trying to grow peppers in a pot for the first time, these tips will help you have a successful crop.
So, if you are looking for a way to add some zing to your meals, start growing bell peppers today!
Let’s get started:
Introduction to Bell Peppers
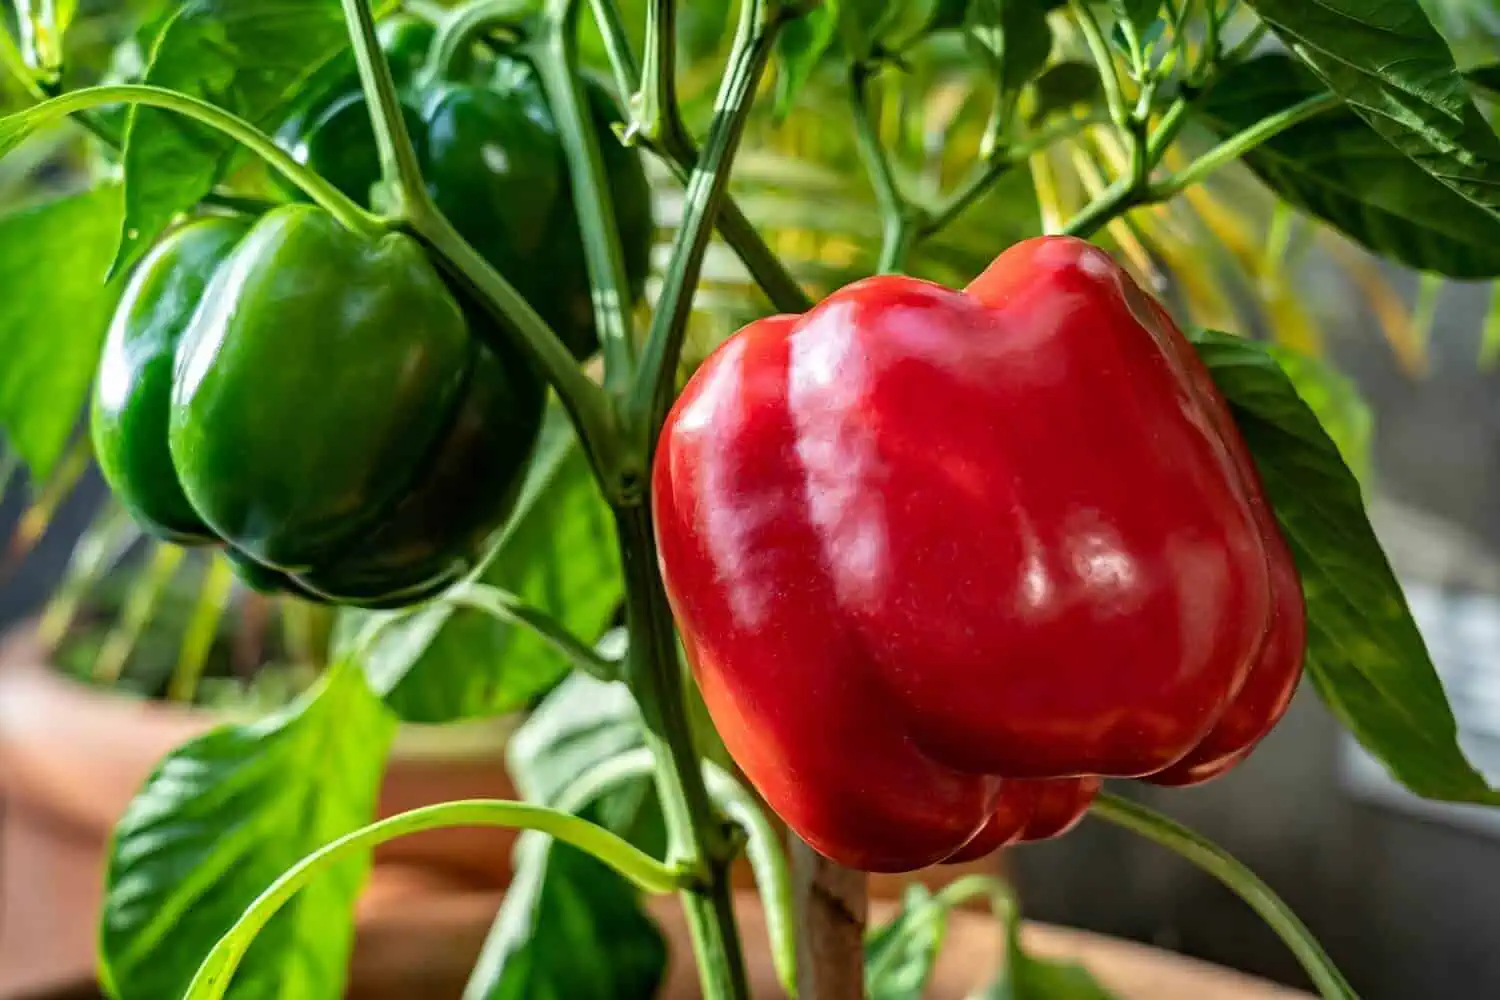
Bell peppers, (Capsicum annuum) are a common sight in grocery stores and kitchens, but there is more to these crispy vegetables than meets the eye.
Though they are often referred to as simply "peppers," bell peppers are actually a type of fruit.
They are native to Central and South America, but can now be found in gardens all around the world. Bell peppers come in a variety of colors, including red, green, yellow, and orange.
They are also available in different sizes, from mini peppers that are perfect for snacking to large ones that can be stuffed or used in salads.
As for taste, bell peppers range from sweet to mildly spicy. The common green pepper sits at the bottom of the Scoville scale with zero heat units, while the rarer red variety registers at about 500.
No matter what the color or size, bell peppers make a delicious and nutritious addition to any meal. If you’re interested, here’s a list of 15 Types of Pepper Plants to Grow in Your Garden.
Growing Bell Peppers in Pots – Step by Step
1. Sowing bell pepper seeds

Here’s a step-by-step process for growing bell peppers from seed:
Get a pot
Any size pot will do, as long as it has drainage holes at the bottom. You can use a plastic or clay pot, or even a recycled container like an egg carton.
Fill your pot with potting mix
Potting mix is a lightweight, well-draining soil that's perfect for starting seeds. You can find it at your local garden center.
Sow your seeds
Bell pepper seeds are tiny, so it's best to sow them on the surface of the soil and then lightly cover them with more potting mix.
Water gently
Water your bell pepper seeds carefully, using a spray bottle to avoid washing them away.
Place in a warm, sunny spot
Bell peppers need warm temperatures to germinate, so place the pot in a warm spot such as a bright windowsill. Keep the soil moist and wait for the seeds to germinate, which usually takes 7-14 days.
Keep the soil moist
The key to successful seed germination is to keep the soil moist but not wet. Water your bell pepper seeds every few days, or as needed, to keep the soil evenly moistened.
Wait for germination
It can take up to two weeks for bell pepper seeds to germinate, so be patient! Once your seedlings start to emerge, thin them out so that each one has its own space in the pot.
Transplant when ready
Once the seedlings have grown their first true leaves and several inches tall, they are ready to be transplanted into individual pots.
Fill pots with a good quality potting mix and transplant the seedlings, being careful not to damage their roots. Water well and place in a warm, sunny location.
If you want to learn more, here’s a Complete Guide on How to Sow Seeds Indoors.
2. Best Soil for Growing Bell Peppers in Containers
Bell peppers need well-draining soil that is high in organic matter. The best way to ensure your pepper plants have well-draining soil is to mix equal parts perlite, vermiculite, and peat moss.
You can also add some compost or manure to the mix for extra nutrients.
You'll also want to make sure the potting mix is relatively light, as bell peppers need plenty of airflow around their roots.
If you’re pressed for time and cannot make your own mix, you can opt for a ready-made commercial potting mix that has all the qualities needed to grow a healthy plant.
3. Pot selection
The ideal container size for bell peppers will depend on the ultimate size of the plant. This means that the size of the container should be proportional to the size of the plant.
It’s estimated that given the right growing conditions, the bell pepper plant size is 3 - 5 feet tall and 16 - 20 inches wide.
Therefore, choose a pot that is at least 12 inches wide with a depth of 18 inches. This will give the roots enough room to grow and thrive. If you are growing multiple plants in one pot, you will need to increase the pot size accordingly.
Remember, the bigger the pot, the more water it will need. So make sure you have a good watering schedule that takes into account the size of your pot.
Alternatively, you can start in a smaller pot and repot up as your plant grows. Always remember, if you’re not sure what size of the container to choose, it is best to err on the large side.
4. Watering your Peppers
Water your bell pepper plants regularly to keep the soil moist but not soggy. Peppers need about 1 inch of water per week. Water early in the day so the leaves have time to dry before nightfall, which will help prevent fungal diseases.
Besides, the prevailing weather conditions will always determine how often to water your bell pepper plants in pots. In general, water your plants once a week. However, during the hot summer months, you may need to water them more frequently.
If you notice that your pepper plants are wilting or the leaves are turning yellow, this is a sign that they need more water.
Here are the most important do’s and don’ts when it comes to watering your plants:
Do: check the soil moisture level before watering.
Before watering your bell pepper plants, check the soil moisture level by sticking your finger into the soil. If the soil is dry several inches below the surface, then it is time to water.
Don’t: avoid getting water on the leaves of the plant.
Splashing water on the leaves of plants can cause fungal diseases, so it is important to avoid getting water on them if possible. Instead, focus on watering the roots of the plant. Alternatively, make sure to water early in the day so that the leaves have time to dry.
If you’re interested in learning more, here’s How to Water Potted Plants and Keep Them Happy.
5. Light exposure
The best light exposure for bell peppers is direct sunlight for at least six hours per day. Indirect but bright light can still do the job but you need to move your plants outdoors if the weather is favorable.
If your bell peppers are not getting enough light, they will start to stretch and become leggy. In case the light isn’t sufficient, you can use grow lights that emit full-spectrum light.
To maximize light exposure of your plants from all angles, make sure to rotate your plants regularly.
6. Temperature and humidity
Bell peppers are warm-season crops and grow best at temperatures between 18 and 30°C (65–86°F). If the temperature is below 60 degrees Fahrenheit, it will impact the flowering and subsequent loss of yield.
Besides, humidity is equally vital and these plants need a lot of humidity. If the air is too dry, the peppers will start to wilt and the leaves will turn brown if the situation isn’t rectified.
For optimal growth, the ideal humidity for bell peppers is between 70 and 80 percent.
You can increase the humidity around your plant by placing it on a pebble tray or by using a humidifier. Grouping your houseplants can also help in increasing the humidity around them.
7. Fertilizer application
Peppers will benefit from applications of fertilizer to keep them supplied with essential nutrients.
A timed-release fertilizer can be applied at bloom or the plants can be fed with a liquid fertilizer at planting and every two weeks thereafter
8. Supporting the Plants
Pepper plants can produce a heavy load of fruit and it can be helpful to provide the plants with some support using stakes or cages to prevent branches from breaking under the weight.
Use soft material to tie plants to stakes or cages.
9. Pruning Bell Pepper Plants
Pruning bell pepper plants help to encourage new growth and can also help to prevent disease and pests from attacking the plant.
The best time to prune bell the plants is in the early spring before they start to produce new growth.
To prune a bell pepper plant, simply cut off any dead or diseased leaves or stems. You can also trim back any long or straggly branches.
Pro Tip: When pruning bell pepper plants, be sure to use sharp, clean shears or knives. Also, make sure to remove all of the dead or diseased leaves and stems from the plant.
10. Mulch your Plants
Mulching your bell pepper plants can help to conserve moisture and reduce weeds. Use a layer of organic mulch, such as straw, around the base of the plants.
11. Deadheading
Deadheading bell pepper plants simply means removing the dead or dying flowers from the plant. This is important because it allows the plant to direct its energy toward producing more quality flowers and fruits.
You should deadhead your plants when the flowers start to wilt or turn brown.
To deadhead your bell peppers, simply cut off the flower stem at the base of the plant. You can use pruning shears or a sharp knife for this.
Deadheading your peppers on time will likely improve yield, as the plant will direct its energy toward producing fruits.
12. Pests and diseases management
Bell peppers are susceptible to a wide variety of pests and diseases. However, when you’re growing the plants in pots, it’s not much of a problem because the level of exposure is generally low. But it doesn’t hurt to learn a bit about them – just in case.
Bacterial diseases
Bacterial diseases are one of the most common problems that bell peppers face. Some of the most common bacterial diseases include bacterial leaf spots, bacterial wilt, and bacterial canker. These diseases can cause the leaves of the pepper plant to turn yellow or brown, and can also cause the plant to wilt.
Fungal diseases
Fungal diseases are another common problem that bell peppers face. Some of the most common fungal diseases include powdery mildew, downy mildew, and anthracnose. These diseases can cause the leaves of the pepper plant to turn yellow or brown, and can also cause the plant to wilt.
Insect pests
Some of the most common insect pests include aphids, caterpillars, spidermites, thrips, flea beetles, and whiteflies. These pests can cause the leaves of the pepper plant to turn yellow or brown, and can also cause the plant to wilt.
For more information on all the pests and diseases, symptoms, causes, and management, refer to this article by PlantVillage.
13. Harvesting and storage
Bell peppers are typically ready to harvest 75-80 days after planting. You'll know they're ready when the peppers are firm and the skin is glossy.
To harvest your peppers, cut the fruits from the plant using a sharp knife. Be careful not to damage the plant.
You can store the peppers in the fridge for up to two weeks. Just make sure to place them in a plastic bag or container with holes for ventilation.
Besides, you can freeze them for longer-term storage. First, wash and slice the peppers. Then, blanch them in boiling water for two minutes. Finally, place them in a freezer-safe container or bag and store them in the freezer for up to six months.
Conclusion
Growing bell peppers in pots is a great way to have your own food without using up a lot of space.
By following the tips I’ve outlined in today’s post, you can be sure to have a successful experience with growing bell peppers at home.
Give it a try and let me know how it goes!
Until then, happy gardening.
Extremely educative at spoon fed level to diverse readers. Congratulations.