Did you know that a watermelon is botanically regarded as a vegetable? I know it sounds made up because it’s often consumed as a fruit. But in reality, it belongs to the pumpkin family (Cucurbitaceae).
All that aside, the watermelon (Citrullus lanatus) is an annual, herbaceous plant with creeping or climbing tendrils that most people picture sprawling across a sunny field, their vines wandering far and wide.
After all, that's how they've been grown for thousands of years. In fact, watermelons originated in Africa and have been cultivated for over 4,000 years. Yet today, gardeners are proving that these giant fruits don't need acres of space to thrive.
A sturdy container, a sunny corner, and a vertical support system can turn even a small patio or balcony into a surprisingly productive watermelon patch.
Plus, growing watermelons vertically has its own perks. For instance, it saves space, improves air circulation, makes harvesting easier, and keeps fruits cleaner by lifting them off the soil.
If you've been dreaming about harvesting your own sweet watermelon but don't have room for a traditional garden, this step-by-step guide will walk you through everything you need to know.
13 Steps for Growing Watermelon in Containers Vertically
Step 1: Choose the Right Watermelon Variety

Photo: SeedSaversExchange
Not every watermelon is suitable for container growing or vertical gardening. Some varieties produce fruits weighing 20 pounds or more, which can put tremendous stress on trellises.
Therefore, it’s important to choose smaller cultivars that are much easier to manage.
Look for compact watermelon varieties such as Sugar Baby, Bush Sugar Baby, Golden Midget, Mini Love, Blacktail Mountain, and Little Darling.
These varieties typically produce fruits weighing between 4 and 10 pounds, making them ideal candidates for vertical support systems.
Step 2: Select a Large Container
Watermelon vines may grow upward, but their roots still need room to spread.
A common misconception is that container gardening means using small pots. Watermelons appreciate generous root space, and restricting roots often leads to poor growth and undersized fruit.
Choose a container that holds at least 15 to 20 gallons of soil. If you have to err, err on the larger side.
Half-barrels, fabric grow bags, large plastic pots, and raised planters all work well. Aim for a minimum depth of 18 inches. Aside from the pot size, you have to pay attention to drainage, especially whether the pot has holes.
Watermelons dislike soggy roots. Excess water should drain freely rather than pooling at the bottom of the container.
Step 3: Use High-Quality Potting Mix

Sugar Baby Watermelon in a Pot
Good soil can make the difference between a struggling vine and a productive one.
Avoid filling containers with ordinary garden soil. It tends to compact in pots, reducing drainage and oxygen around the roots.
Instead, use a high-quality potting mix enriched with organic matter.
A simple blend might include:
- Quality potting mix
- Compost
- Coconut coir or peat moss
- Perlite for drainage
The finished mixture should feel light, airy, and moisture-retentive without becoming waterlogged. Watermelons are heavy feeders, so mixing compost into the soil from the beginning provides a slow-release nutrient boost.
Step 4: Build a Strong Trellis

This is the backbone of the entire project because while watermelon vines may not seem heavy at first, mature plants carrying fruit can become surprisingly weighty.
A flimsy support often starts leaning at the exact moment you need it most.
Choose a sturdy structure such as: Cattle panel trellis, Wooden A-frame trellis, Metal Garden arch, or Reinforced wire mesh panel.
The trellis should stand at least 5 to 6 feet tall and be securely anchored.
Before planting, install the support system. Trying to add a trellis later can damage roots and disturb growing vines.
Step 5: Plant Seeds or Seedlings

Photo: The Seed Collection
Watermelons thrive in warm soil. If your growing season is long, direct sowing works beautifully. Plant two or three seeds about 1 inch deep near the center of the container.
Once seedlings develop their first true leaves, thin them to the strongest plant.
If you're starting with nursery transplants, carefully place the seedling at the same depth it was growing in its original container.
After planting, water thoroughly so the soil settles around the roots, ensuring that you eliminate air pockets and encourage rapid establishment.
Step 6: Position the Container in Full Sun
These fruits, or rather veggies, like warmth and moisture. Cold and wet periods can bring growth to a standstill and even cause the fruit to drop.
The more sunlight they receive, the sweeter the fruit typically becomes. Therefore, it’s a good practice to aim for at least 8 hours of direct sunlight daily. Ten or more hours is even better.
A south-facing patio, deck, or garden area usually provides excellent conditions. Remember that if sunlight is limited, vines may survive, but fruit production often suffers, which defeats the whole purpose.
Step 7: Train the Vines Upward

Photo: Abundant Mini Gardens
Once vines begin extending, gently guide them toward the trellis.
Many gardeners are surprised by how cooperative watermelon vines can be. Their tendrils naturally seek support and wrap around nearby structures.
At first, you may need to loosely tie stems using soft garden ties, cloth strips, or plant clips. You should avoid tying too tightly, though. This is because the stems continue expanding as they grow, and constricting them can cause damage.
Check the vines every few days and redirect wandering growth back toward the trellis.
Step 8: Water Consistently
As a general observation, container-grown plants dry out much faster than those planted in the ground. Hence, during hot weather, daily watering may be necessary, ensuring that the soil remains evenly moist but not saturated.
Deep watering encourages stronger root systems and healthier vines. Inconsistent moisture can lead to poor fruit development, cracking, or reduced sweetness.
A layer of mulch on top of the soil helps slow evaporation, thus retaining moisture for longer and keeping roots cooler during summer heat.
Here’s how to water potted plants and keep them happy.
Step 9: Fertilize Throughout the Season
Adequate fertilizer application is important because the plant invests tremendous energy into producing long vines, flowers, and eventually large fruits.
You should start with a balanced slow-release fertilizer during early growth.
Once flowers begin appearing, switch to a fertilizer that's slightly lower in nitrogen and higher in phosphorus and potassium to support reproductive development. Too much nitrogen encourages leafy growth at the expense of fruit production.
The rule of thumb is to apply diluted liquid fertilizer every two to three weeks throughout the growing season.
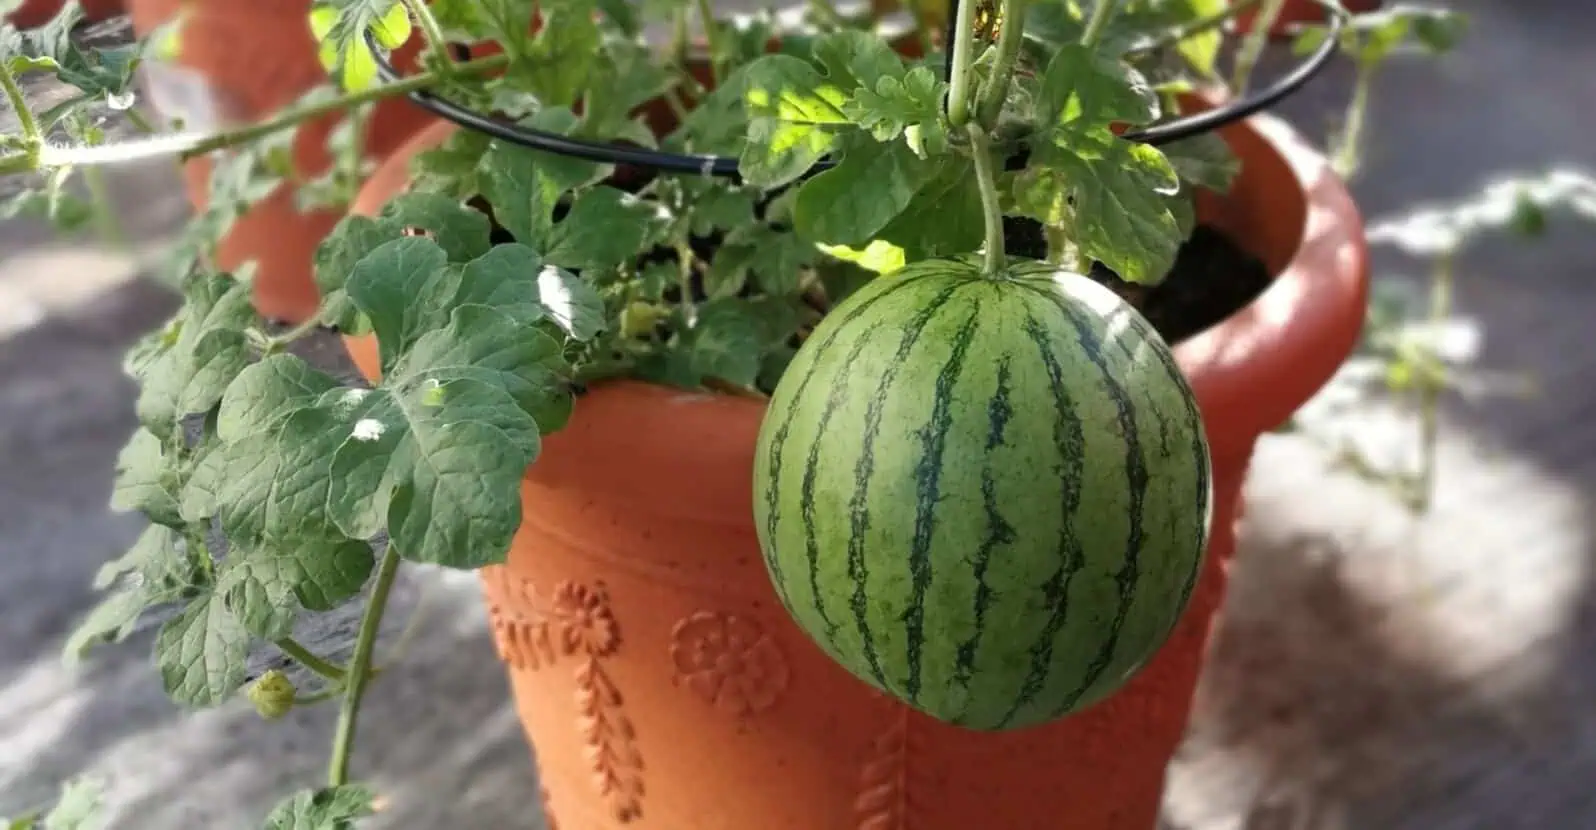
Step 10: Support Developing Fruits

Imagine watermelon plants growing in a large field, each with giant fruits. The only reason they don’t stain the vines is that the ground is supporting them.
When growing them in restricted containers, we don’t have that luxury. Without a proper mechanism, the fruits will certainly fall off the trellis.
Fortunately, with a bit of creativity, you can solve that conundrum.
To do that, as melons begin to enlarge, create slings to support their weight. Old T-shirts, mesh produce bags, nylon stockings, and soft fabric all work well.
Attach the sling securely to the trellis while allowing room for the fruit to expand and rest in the sling. The sling acts like a hammock, cradling the watermelon as it grows. Without support, larger fruits may strain the vine or break away prematurely.
Step 11: Encourage Pollination
Pollination is a vital aspect when it comes to growing watermelons successfully. This is where an abundance of pollinators plays a crucial role.
Bees typically handle the job beautifully, moving pollen from male flowers to female flowers. If pollinator activity seems low, hand pollination can improve fruit set. So, use a small paintbrush or cotton swab to transfer pollen from male flowers to female flowers.
Female flowers are easy to identify because they have a tiny baby watermelon directly behind the bloom.
You can hand-pollinate in your free time as a way to unwind from your busy schedule so that it doesn’t feel like a boring chore.
Step 12: Pests and Diseases

Watermelon Gummy Stem Blight
The most devastating diseases affecting watermelons, such as Fusarium and Phytophthora, are often caused by soil-borne pathogens. Luckily, choosing the right mix discussed in step 3 saves us the trouble of having to deal with those diseases.
Besides, most container-grown plants are almost pest-free in most cases. Common ones include thrips, whiteflies, squash bugs, aphids, flea beetles, and leaf miners. However, you need to pay attention just in case you need to take action.
For instance, powdery mildew can develop during humid weather, especially when airflow is restricted. Vertical growing already helps reduce this risk, but spacing plants properly and avoiding overhead watering provide additional protection.
Also, watch out for anthracnose and gummy stem blight, which appear as lesions on leaves that are amorphous, dark, and may appear water-soaked.
In case you want to dive deeper into common diseases and how to identify them, here’s a comprehensive guide.
Step 13: Harvesting

Photo: HGTV
Unlike other fruits or vegetables, such as tomatoes, watermelons don't continue ripening after harvest. Therefore, several clues can help determine readiness.
The tendril closest to the fruit often turns brown and dries up. The underside of the melon changes from pale white to creamy yellow. The fruit also develops a duller appearance compared to its glossy immature stage.
You can also listen for a deeper, hollow sound when gently tapping the melon. Harvesting at the right moment rewards you with the sweetness you've been waiting months to enjoy.
Needless to say, harvesting at the right moment will determine the quality of your produce.
Conclusion
One thing I’ve come to learn and appreciate is that you can grow almost any plant in containers and they’ll thrive.
And the watermelon is not an exception.
You just need a few tips and tricks up your sleeve, and you’ll be on your way to growing juicy and tasty watermelons.
If you found this guide helpful, please share it with fellow gardeners on Facebook and save it to Pinterest so you can come back to it when watermelon planting season arrives.